Case Study in Brief
Description
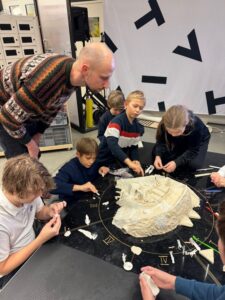
This was a multi-session creative engineering workshop for primary school students (ages 8-13), where five different age-based groups collaboratively designed and constructed a complex chain-reaction machine. Each group had 90 minutes to build a segment, iterating on the previous group’s work. The final goal was to trigger a pen and paper to land on a table for the symbolic signing of a cooperation treaty between the Estonian National Library and a Creativity Centre. The workshop fostered teamwork, imagination, and problem-solving, and took place in an exploratory makerspace filled with tools, inspiration, and hands-on materials.
Dispatch From the Field
Objectives
- Build a functional and imaginative Rube Goldberg machine collaboratively across multiple student groups.
- Develop teamwork, creative problem-solving, and hands-on prototyping skills.
- Encourage students to build upon others’ ideas and refine them.
- Foster understanding of cause-effect relationships and interconnected systems.
- Create a real-world outcome where the machine initiates a symbolic act (treaty signing).
Activity Flow
1. Introduction and Framing (15–20 min)
Each session begins with a short presentation introducing Rube Goldberg and showcasing fun, varied examples through video, photos, and storytelling. The facilitator highlights the final goal and shows what previous groups have built so far to help new participants connect to the bigger picture.
2. Group Division and Area Orientation (5–10 min)
Students are divided into 4 groups and each is assigned a segment of the machine within a designated U-shaped layout. Each team is responsible for continuing the chain-reaction flow from the last point.
3. Ideation and Sketching (15 min)
Each team sketches out their ideas, imagining how their segment could work, how it connects to the previous part, and what materials or mechanisms could be used.
4. Building and Testing (60 min)
Teams bring their ideas to life using various materials. They must repeatedly test and refine their part of the machine to ensure that it functions reliably and connects to the larger sequence. Facilitators provide feedback, troubleshoot ideas, and answer questions.
5. Demonstration and Handover (5–10 min)
Each group presents how their section of the machine works and explains their design decisions. This ensures the next group can build on it in the following session.
Space and Setup
The activity took place in a zoned makerspace designed for experimentation and collaboration. Areas included zones for dirty work, tool use, exploration, presenting, and fun. The machine itself took over a portion of the space, growing with each session. Groups worked in connected segments arranged in a U-shape around shared tables with carts full of inspiring objects and tools. The setup supported hands-on engagement but was also noisy and at times overwhelming, especially for students needing individual focus. There were few quiet or reflective spaces, and grouping happened quickly: some students felt confused or excluded. Despite this, the open space and “controlled chaos” encouraged creativity and exploration.
6. Facilitation Tips
- Start with clear, engaging examples to inspire and explain the task.
- Guide students in thinking about how their segment connects with others.
- Monitor inclusion closely, especially in large groups, use name tags or color coding for teams.
- Encourage iteration and testing, remind students it’s okay if things don’t work on the first try.
- Be mindful of overstimulation, some students may need quieter, one-on-one support or alternative ways to participate.
- Add extra facilitators for large groups to ensure all children receive guidance and support.
Practical Details – Facilitator’s Notes
How did you modify the activity?
Not majorly modified from the activity.
Workshop Duration
- Per session: 90 minutes
- Total process: 5 iterative sessions across approx. 2 weeks
- Participants per session: ~30 students (ages 8–13)
How did you organize the space?
The space was organized into four connected work zones arranged in a U-shape, with each group responsible for one segment of the Rube Goldberg machine. Tables were filled with diverse materials and surrounded by mobile tool carts for easy access. The machine grew progressively through each session, so previous groups’ builds remained visible to guide the next teams. The space was purposefully filled with “controlled chaos” to stimulate creativity, and zones were designated for ideation, construction, testing, and presenting. While the setup encouraged active collaboration, it lacked quieter areas for reflection, which impacted some students’ ability to focus.
Who did you work with?
We worked with students aged 8-13 from Tallinn Central Primary School, brought in by their teacher as part of a curriculum-diversifying activity at the VIVITA Youth Creativity Centre. Each group had around 30 participants, with an equal mix of boys and girls. While many children eagerly engaged in hands-on building and testing, others, especially quieter or neurodivergent participants, struggled with the fast pace, group noise, and lack of reflective space. Some Ukrainian students, not yet fluent in Estonian, did not participate in the group task but instead explored the materials independently. The activity was led by one facilitator and two product designers, with participants rotating across five sessions.
What resources did you use?
The workshop used a large assortment of materials: recycled everyday objects, prototyping tools, creative supplies, and building components, all stored in easily movable carts and containers. A screen and speakers were used for inspirational videos. The space itself was a key resource: a zoned makerspace offering flexible areas for dirty work, collaboration, and showcasing previous groups’ work. Creative clutter and object variety inspired experimental building, while carts and tables allowed quick reconfiguration. However, the space lacked quieter zones for individual focus or decompression.
Materials Needed
- Everyday and recycled objects (balls, tubes, ramps, dominoes, levers, string, boxes)
- Craft materials (tape, glue, scissors, paper, markers)
- Modeling tools and construction materials (cardboard, wood pieces, plastic components)
- Prototyping carts and containers (on wheels for easy access)
- Visuals and videos for inspiration (Rube Goldberg examples)
- Display screen and speakers for instruction
- Floor space and modular tables for building machine sequences
What did you learn?
We learned that while collaborative chain-reaction building is highly engaging, large group sizes and fast pacing can leave some students behind, especially those who need more structure, support, or quiet. One facilitator was not enough for 30 children; more adult presence would have allowed for better observation, feedback, and inclusion. Starting the activity with sketching helped focus the students, but team formation needed more intentional guidance. The noise level and excitement suited many students but overwhelmed others. In future iterations, we’ll introduce better visual team identifiers, clearer group instructions, and optional quieter activities. Iterative building across sessions worked well, and showing the progress of previous groups helped participants connect their contribution to a bigger goal.